


The Mad Hatter
Well, I actually started this hat over on another page, but since hubby seems to have included it in his merchant concept sketch, I'm relocating it here....
I've actually managed to finish something!
I made the plastic canvas hat forms (post on the thunderhosen page), and all was left was to cover them with fabric. I used a scrap of black cotton velveteen. In case you're curious about my construction after that:
1) cut a large round to cover crown (radius of crown plus a bit for a rolled hem), and 2 rounds of fabric to cover the brim. I have used cotton velveteen on both sides, though my bottom side is pieced in two halves (fabric conservation is SO period). I allowed ~1 inch on either side of the plastic form--the outer rim for seam allowance and the inner for making a nice clipped curve like in PoF (page 94).

2) I traced around my plastic brim donut right onto the velvet's wrong side and sewed the top and bottom together (without the plastic in there, i don't think my sewing machine would appreciate plastic)
3) Join plastic canvas brim and crown sections with the age old technique of granny yarn.
4) Slip previously sewn velvet brim over the plastic brim donut. This kinda worked like a steering wheel cover, and I got a nice tight fit from the tracing method. Clip inner curves so they lie flat along the crown, inside and out.
5) I gathered my crown fabric along three lines, as in the PoF example...one right next to top of crown, one in the middle, and one near the brim. I did 45 pleats on all three levels, in concentric circles of cartridge pleating--I drew wagon wheel spokes on the wrong side of the fabric to keep the pleats even.
6) Put cover on crown, tighten pleats and fuss with them all you're willing to. I fussed a lot over getting the pleats even. They're still not even, but well, it looks fine to me anyway. Whipstitch crown cover down to brim cover (i pushed mine flat for this, though you could leave them sticking out like true cartridge pleats).
7) Make lining to fit inside crown. Mine is a red "silk" (quotes mean its synthetic! ;)) I attached mine to the upper edge of the crown and then whipstitched into the brim. I would like to add a "sweat band" so the lining doesn't get too nasty, but don't have the right material for that right now. (mental note to lint brush this puppy!)

8) Decorate!
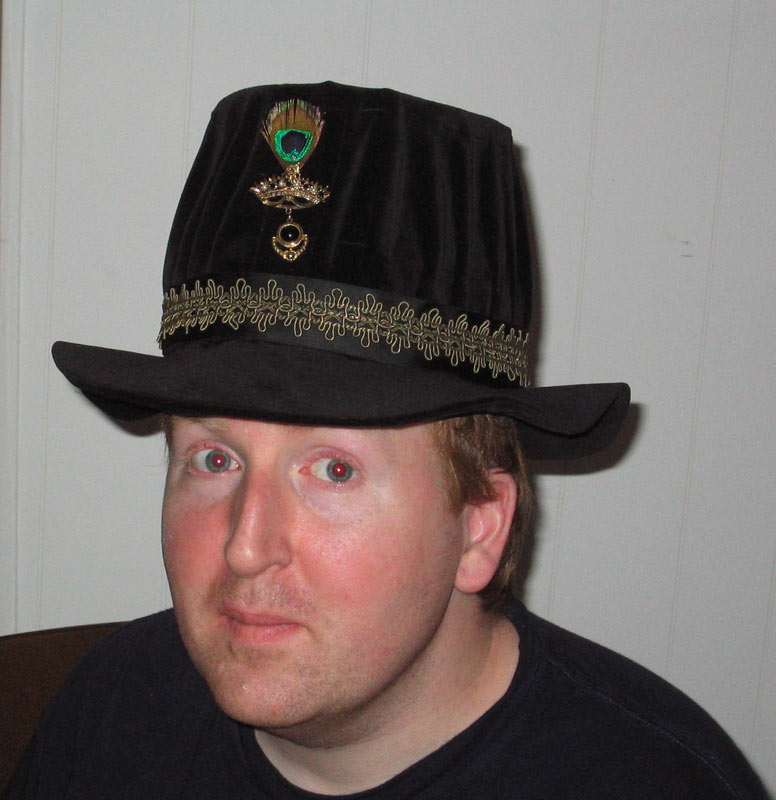
Adam's ended up like this, I:
I did learn an important lesson, though..if you want the brim to lie flat, you must cut the donut hole in an oval, rather than a complete circle. Cuz yeah, humans don't have perfectly round heads (unless its charlie brown). Still, i think the wavy brim is period, so it doesn't bother me:

image from Janet Arnold PoF
That's all folks...back to daydreaming...
I've actually managed to finish something!
I made the plastic canvas hat forms (post on the thunderhosen page), and all was left was to cover them with fabric. I used a scrap of black cotton velveteen. In case you're curious about my construction after that:
1) cut a large round to cover crown (radius of crown plus a bit for a rolled hem), and 2 rounds of fabric to cover the brim. I have used cotton velveteen on both sides, though my bottom side is pieced in two halves (fabric conservation is SO period). I allowed ~1 inch on either side of the plastic form--the outer rim for seam allowance and the inner for making a nice clipped curve like in PoF (page 94).

2) I traced around my plastic brim donut right onto the velvet's wrong side and sewed the top and bottom together (without the plastic in there, i don't think my sewing machine would appreciate plastic)
3) Join plastic canvas brim and crown sections with the age old technique of granny yarn.
4) Slip previously sewn velvet brim over the plastic brim donut. This kinda worked like a steering wheel cover, and I got a nice tight fit from the tracing method. Clip inner curves so they lie flat along the crown, inside and out.
5) I gathered my crown fabric along three lines, as in the PoF example...one right next to top of crown, one in the middle, and one near the brim. I did 45 pleats on all three levels, in concentric circles of cartridge pleating--I drew wagon wheel spokes on the wrong side of the fabric to keep the pleats even.
6) Put cover on crown, tighten pleats and fuss with them all you're willing to. I fussed a lot over getting the pleats even. They're still not even, but well, it looks fine to me anyway. Whipstitch crown cover down to brim cover (i pushed mine flat for this, though you could leave them sticking out like true cartridge pleats).
7) Make lining to fit inside crown. Mine is a red "silk" (quotes mean its synthetic! ;)) I attached mine to the upper edge of the crown and then whipstitched into the brim. I would like to add a "sweat band" so the lining doesn't get too nasty, but don't have the right material for that right now. (mental note to lint brush this puppy!)

8) Decorate!
Adam's ended up like this, I
 | 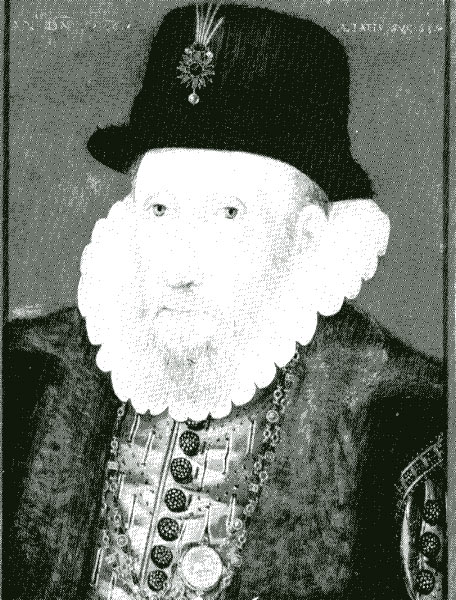 image from Janet Arnold PoF |
I did learn an important lesson, though..if you want the brim to lie flat, you must cut the donut hole in an oval, rather than a complete circle. Cuz yeah, humans don't have perfectly round heads (unless its charlie brown). Still, i think the wavy brim is period, so it doesn't bother me:

image from Janet Arnold PoF
That's all folks...back to daydreaming...
posted by Julebug | 9:13 PM
![]()
4 Comments:
So cute! And not nearly as large as I'd been led to believe! I love it. Carry on with the daydreaming then. And by daydreaming, I mean "cutting out the outfit and stitching it together."
Hmmmm....I can see why you think my hat looks small. ;) Seriously, though, his hat got a lot more trim looking when I taked the pleats down to the sides and put the band on--when they were standing out, it made his head look really silly wide.
And I'd much prefer daydreaming to shirt making....
I like it! I need a bonnet for my bustle dress and that makes it seem doable!!
Yeah, it wasn't really as hard as I'd feared. If I can do it, its certainly achievable. My geometry skills are um, well, we'll just say "old".
Post a Comment
<< Home